All About: Spray Tanning!

Hey Dolls,

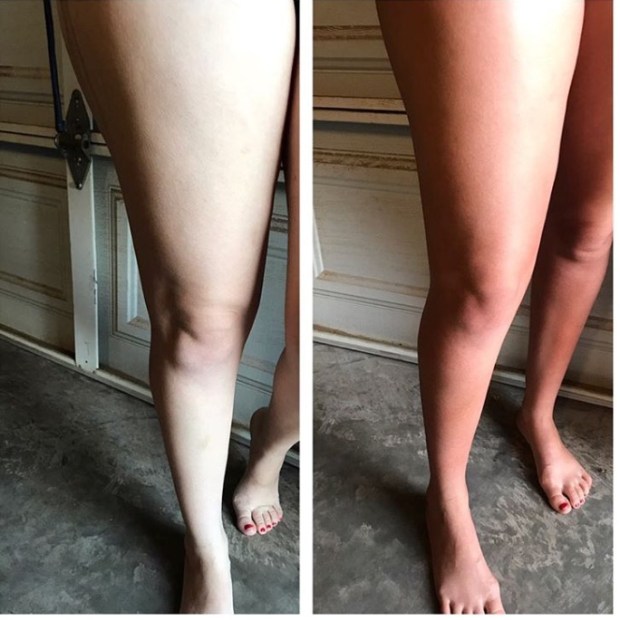
This week we are going to talk about Spray Tans! Now being from Essex, most people (not all unlike the stereotype) like to have a golden glow and I chatted to the Beauty Yard’s Sophie to get all her top tips, so let’s go!

IMG_0144

First up: Prep, this is an extremely important step that will ultimately determine the end result of your tan and here’s how to do it right!

  1. Shave or complete your hair removal at least 24hrs before your tan, to ensure your pores close up properly
  2. Exfoliate your body focusing on dry areas such as elbows, feet and knees
  3. Ensure all your makeup is removed to allow for a perfect tan

IMG_0146

Now lets talk about the tanning process at the salon:

  1. Before you go to the salon make sure you are wearing loose dark clothing, have some flip flops and aren’t wearing any deodorant, moisturiser or other scented products as these can affect the colour of the tan
  2. Once you arrive you will meet your spray tanner, be taken to a therapy room, left to remove your clothes, apply sticky feet and sometimes a hair net, you may also be given paper knickers
  3. Your therapist will then return, giving you instructions on positions to stand in so they can tan you, the tan will be cold, and you will probably be a bit sticky, your therapist will most likely dry you off a bit!

IMG_0145

The last part of spray tan is the aftercare, this is key in prolonging your tan!

  1. Shower at least 8hrs (for most tans some are less, some more so check with your spray tanner) after spray tan
  2. When showering don’t use any products or rub your tan, pat yourself dry and moisturise
  3. Make sure you moisturise after every shower
  4. When the tan starts to go patchy or fade exfoliate to ensure a gradual fade

So that’s all you need to ensure you get a perfect spray tan!

Next week I’ll be sharing my review of Glam Glow face Masks!

Ciao Bellas,

S

xxx

All About: Lashes

Hey Dolls,

I headed back to the Beauty Yard to chat to the lovely Tan about the different types of lash enhancements available.

The first thing to choose between is natural enhancing or extensions first let’s talk about enhancing your own lashes!

My favourite thing is LVL lashes (length, volume and lift), it’s basically a perm and tint for your lashes that lasts around 6 weeks, it’s low maintance and cheaper than lash extensions. LVL is also great if you are allergic to lash glue or can’t keep up the maintenance of extensions!

IMG_0140.PNG

Moving on to lash extensions, they come in three main styles classic, Tahitian and Russian! First let’s talk about the process, having a set of lashes will take about 2 hours, with regular maintenance every 2-3 weeks.

It’s really important to go to a lash technician who is personally recommend and to ensure you go for a patch test, not only will this ensure you aren’t allergic to the glue but you can also access the professionalism of the salon and technicians.

Now onto the styles:

Classic- 1 false lash to 1 real lash, last 2-4 weeks, maintenance every 2 weeks, giving a natural look

IMG_0141.PNG

Tahitian- 3 false lashes to 1 real lash, last 2-8 weeks, top up every 2-4 week, giving you a half glam look

IMG_0138

Russian- 6-8 false lashes to 1 real lash, same maintenance and longerity as Tahitian, giving you a full glam look

IMG_0139

Next instalment of all about will be tanning!

Ciao Bellas,

S

xxx

All about: Nails!

Hey Dolls,

This post is the first in the series of posts in which I speak to industry professionals about a range of topics!

First up is Nails, I spoke to the lovely Tanith from The Beauty Yard in Chelmsford!

I always have my nails done here so I asked Tanith for her top 5 nail tips, and here they are:

  1. Always use a base and top coat- not only will it prolong the nail varnish it will prevent your nails getting stained. You can get a variety to suit different needs for example nail strengthening
  2. Use Cuticle Oil- using cuticle oil regularly will keep both your cuticle and nails healthy
  3. Don’t over buff- overbuffing your nails removes layers of your nail and causes damage to your nail beds
  4. No picking!- Don’t pick your gel nails, nails or skin around the nail as it will cause damage
  5. Moisturise your nails and hands daily- moisturising daily will keep your hands and nails healthy!

Thats all for this week, also in the series I will be talking to hair stylists, makeup artists and more beauty experts!

Ciao Bellas,

S

xxx